About the Beer Bottling Monobloc. . .

Thursday, July 31, 2014

Bowl fill head parts

Below is a list of the gaskets, seals and bearings. The bearing I found is a sealed bearing - and should last longer than an open bearing.
If you want to get the o-rings your self - I would recommend the red food grade silicon material.

I will be ordering these parts in - and the parts are in.

(1) GB10708.3-89 - Dust Ring

(1) QRQR33- OR5334533 O-ring 53.34x5.33

or  2.1 X 0.209 53.34 MM X 5.33 MM o-ring pg 16 of 60  

or Newman #330 pg 8 - 53.34 x 5.33 - pg 8


(1) GB3452.1-85 - 73.5 x 3.55 - 2.874 X 0.137 73 MM X 3.5 MM o-ring pg 20 of 60 
or Newman #233 - 72.62 x 3.53 - pg 7

(1) GB9877.1-88 - seal Ultimate Industrial - UIS50x72x8ADL-NBR-SS

(1) GB3452.1-85 - 4.173 X 0.139 106 MM X 3.55 MM o-ring pg 24 of 60
or Newman #243 - 104.37 x 3.53 - pg 7

(1) GB894.1-86 - snap ring

(2) GB/T278-94 - 61911 sealed ball bearing

(2) QR41A- 3.149 X 0.208 80 MM X 5.3 MM o-ring pg 21-60
or Newman #338 - 78.74 x 5.33 - pg 8

Fill head Drawing

Friday, June 22, 2012

Lubrication, Lubrication, Lubrication!

The Beer Bottling Machine has lots of moving parts - that are trying to work in a pretty hostile environment.
Lots of movement - lots of liquid - some of it sticky - lots of cleaning with chemicals.
It is important that all of these moving parts - be kept well lubricated.
Food Grade Machine Oil or any number of lubricant that are commonly used in the food industry can be used. These lubricants can be applied either with a brush or a spray - but must be applied!

If it moves - it should be lubricated! - to make sure it continues to move smoothly.

Here I have an example of the bottle lifting pistons binding - and 'lifting' the entire lifting ring!

 The first indicator of the problem is that the lifting wheels did not drop down and ride on the rail when in the lowest position.
 Further investigation indicated that the entire lifting ring had raised up from it's original location. The bolt that was holding the lifting ring locked to the shaft - created a gouge in the shaft - on it's way up.

This was caused by a couple of lifting platforms that had started to bind - not moving smoothly - as they were moving up and down. This lifted the entire lifting ring!
To repair this:
- repair all binding lifting pistons.
- loosen the setscrew.
- raise - yes raise - the lifter ring and inch or so - so that the scared shaft can be repaired.
- lower the lifting ring back into place
- retighten the setscrew.
- TIP - add a bead of caulk to keep liquid from running down the center shaft.

Listen to your machine - it 'talks' to you every day!

Tuesday, May 29, 2012

Bottle Rinser

Rinser Adjustments
The whole rinser assembly can be raised up or down to accommodate your bottle height.
The machine should be adjusted high enough to pick up the bottles at the proper height and set them back down smoothly.
Because the bottles can vary in height slightly and not all the rinser heads hang at exactly the same level you may have to have the bottles land a little high to accommodate the variations.

Height Adjustment:
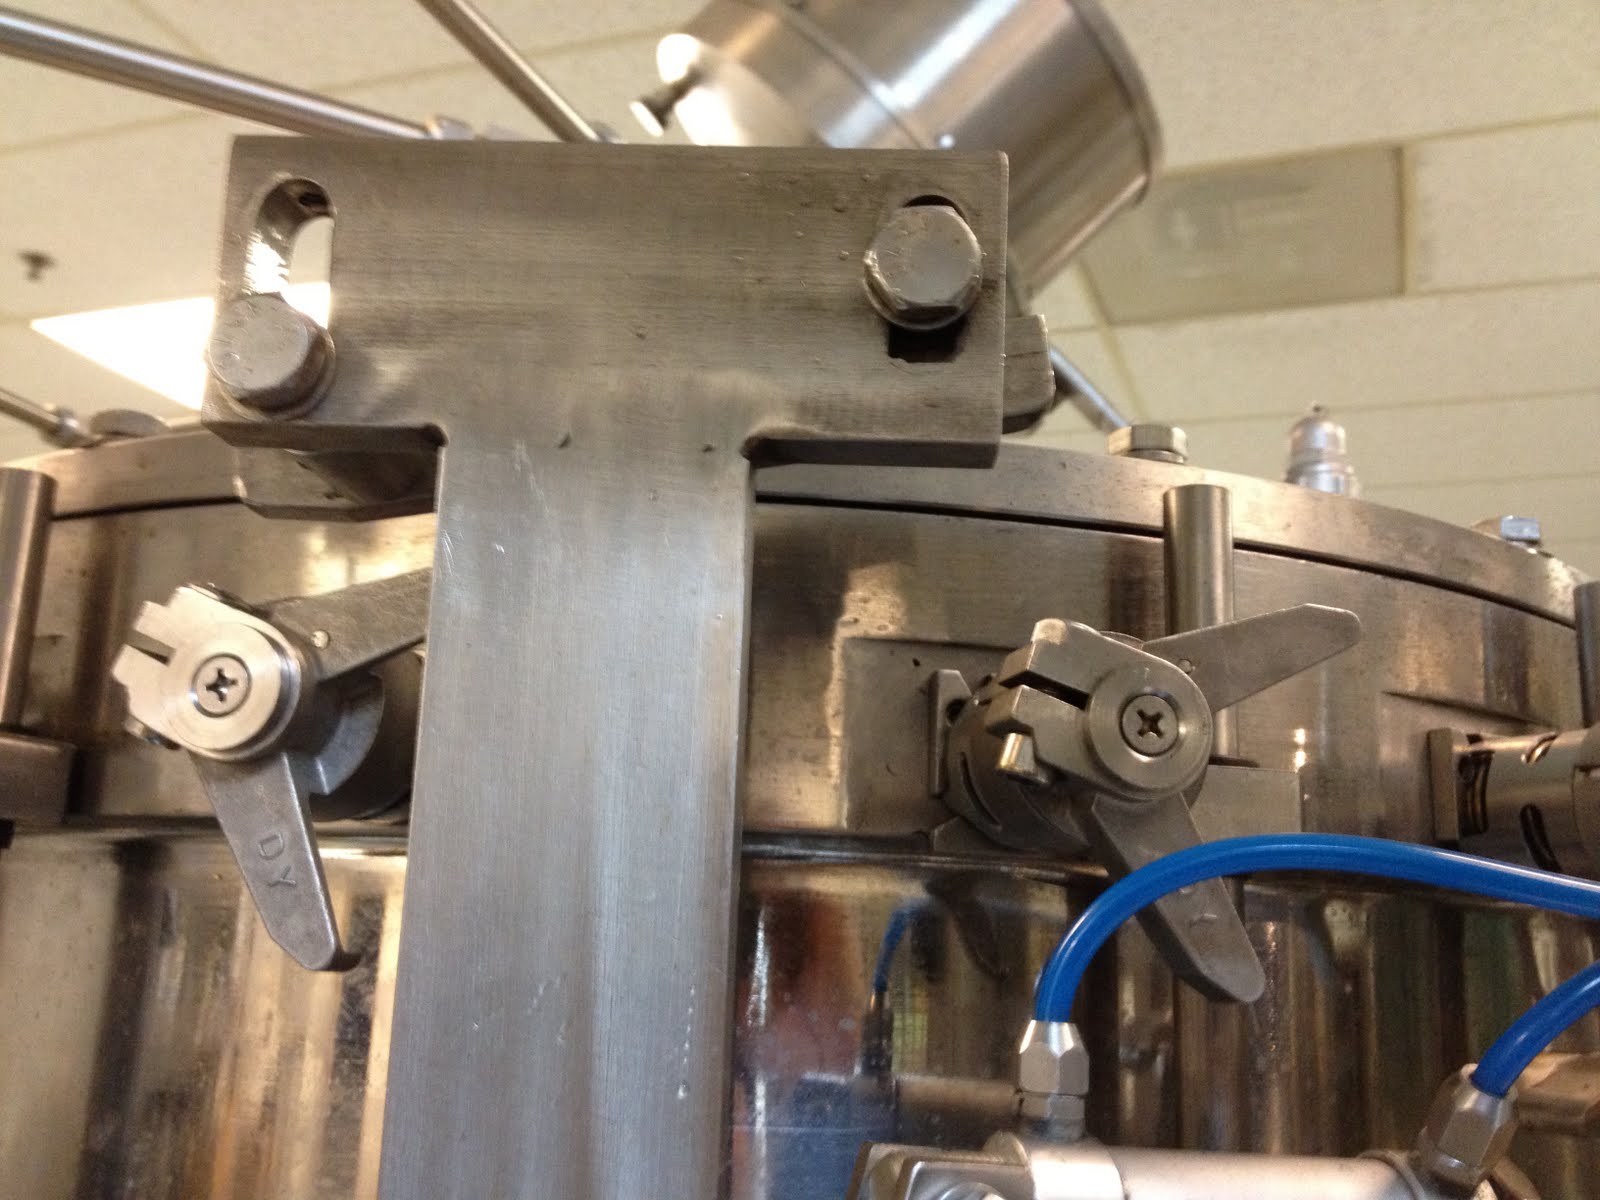
- loosen the bolts on the three legs that support the rinser assembly.
- loosen the two bolts that secure the water line going to the top of the unit.
- under the machine - loosen the jam nut at the base for the threaded rod.
- turn the hand screw to raise or lower the rinser assembly.
- once you are happy with the height retighten the jam nut, leg and water line bolts.

Rotational Alignment:
The (4) bolts over the slotted holes toward the top center of the rinser are for adjusting the rotational alignment of the rinser. 

The two bolt that attach each rinser head to the machine can loosened to optimize the entry of each bottle.

Bottle Jaws:
Before feeding bottles into the machine - as the machine rotates slowly - after it would have picked up a bottle - grab each pair of jaws - and squeeze closed.
If you feel movement:
- check for a weak spring - which may drop the bottle.
- if the spring is good and you still feel movement - you may need to lubricate the jaw arms at the pivot point.
- If the jaws do not open enough to accommodate the bottle neck - check the wheels that open the jaws.
as these ware thin the jaws open less.
- If new plastic jaws have been installed - and the wheel is good - the leading edge of the jaws may need to be ground back to accommodate the bottle neck.


Tuesday, May 1, 2012

Rinsing Filled Bottles

You had asked about a system for rinsing filled bottles - coming out of the bottling line.

Add a solenoid to your water feed - that is tied electrically into the water feed solenoid for your vacuum pump.
(or pull the water supply from the output side of the vacuum pump water solenoid)
Locate this system inside the bottling line enclosure - so the water falls on the deck and is directed to the drain.
Use these components to set up a spray system - that focuses under the bottle cap.
As the bottle leave the bottling line enclosure you can dry the bottles with an Air Knife.

Tuesday, January 17, 2012

Part Breakdown Drawings.

We finally have drawings for most of the parts on these machines.
This will help immensely in being able to describe and specify spare parts.

Yes, they are in Chinese - but at least we have pictures and numbers!

Beer Valve

Inside the bowl - the actuating arm should not rub up and down on the beer valve. The actuator should only touch the beer valve in both the up and the down position.


The left hole beer shut-off actuator was modified to be sure that the beer valve was shut off completely.


This operation was performed with a die grinder and carbide grinding burr.

Rinser - crushed roller wheels

I had the pleasure of working - this week - with a technician from the factory in China.

One of the first things that he did was disassemble the rinser heads - and modify the actuating arm that the small roller operates.


Left arm is unmodified - right arm has a new curve.

He used an angle grinder with a sanding disk to reshape the actuator arm to relieve pressure on the the smaller roller wheel.


New spring were also installed. These are a 1.8mmx15mmx43mm


His tool of choice for removing and installing the springs was a 2" binder clip.
He used the black part as the handle - and hooked the spring with the wire loop.